Quantcast
Channel: RUCHI
Viewing all 234 articles
Browse latest View live

Atti pathal/ Athishaya pathiri / Chatti pathiri/ Atti pathiri ( Layered pancakes with chicken filling ) , A north kerala special

$
0
0

Inspite of me being from Kannur, North kerala ( malabar ), I never heard about this Ari pathal until few years ago, cant really blame me as I lived  in Kannur only few years  while growing up but I was surprised when  my other half who is a Telicherry boy with lots of   Muslim neighbour hood told that  he also dont  know about this. Whenever we go home for a vacation during Ramadan season we used to get lucky to taste the typical Malabar specials  like  Erachi pathiri, Ari kadukka , Unnakai and all which our neighbours used to bring over.  That was my inspiration to try out this Ari pathal  recipe by  Rafeeda    for this months cook out in   Kerala Kitchen. I am glad I made this as we all loved it , especially lil A. Big thanks to Rafeeda :)

Ingedients
For pancakes
All  purpose flour (maida) - 1 cup
Egg - 1 large
Milk - 1 cup
Water( as required )
A pinch salt

For filling ( chicken masala )
Boneless chicken - 250 gm
Onion - 2 medium ( chopped )
Fennel / perum jeerakam - 1/2 tsp
Turmeric powder /  manjal podi - 1/4 tsp
Chilli powder/ mulaku podi  - 1/2 tsp
Coriander powder / malli podi  - 1 tsp
Garam masala powder - 1/4 tsp
Pepper powder/ kurumulaku podi - 1/4 tsp
Ginger - garlic paste ( Inji - veluthulli paste )- 1 tsp
Salt to taste
Curry leaves - 1 sprig ( torn to pieces )
Green chillies (chopped ) - 1-2 ( I didnt use it )
Oil
Coriander leaves 

For final coating( Egg milk mixture )
Egg - 3 numbers
Milk - 1/8 cup
Salt
Pepper

Method

Making of filling
  • In a saucepan cook the chicken adding few tbs of water until done. Shredd the chicken with a spoon or with fingers and keep it aside.
  • In a pan add some oil and sputter fennel , add chopped  onions and saute until soft and light brown.
  • Add ginger garlic paste and fry for 1-2 minutes. Add green chillies and  curry leaves and cook for 2-3 minutes.
  • Add cooked chicken, red chilly powder, turmeric powder, Coriander powder , garam masala, pepper powder, salt  and cook for few minutes until chicken is coated well in masala. Sdd some chopped corainder leaves.
Making Pancakes
  • Make the pancake batter by whisking all the ingredients together by adding enough water to get a thin batter.
  • In a non stick pan pour a small laddle of batter and spread it as thinly as possible. Cook for 2-3 minutes until cooked.
  • Repeat making the pancakes until all the batter has been used up.
Layering and cooking
  • Break 3 eggs in a bowl , add milk, salt, pepper and give it a whisk and keep it aside.
  • Grease a  saucepan with little oil and keep it ready near you.
  • Take one  pancake and dip it in the egg - milk mixture.
  • Place the egg coated  pancake on the greased pancake.
  • Spread the chicken masala on top of the pan cake.
  • Take the second pancake and dip it in egg milk mixture and place it above the first one.
  • Repeat the process by layering chicken masala on top of egg coated pancakes.
  • Pour the remaining egg milk mixture on the top of the layered pancakes and on the sides swells to lock the pancakes.
  • Place the pancake on a low flame and cook for 15 minutes on one side.Carefully flip it ( you can flip it on a plate and then place another plate on the cooked side and flip it again and flip it back into sauepan )
  • Cook the other side for 15 minutes. when done flip it onto a plate. Cut and serve immediately.


Aloo tikki

$
0
0


Simple recipe with few ingredients is what everyone likes. I was chatting the other day with my little sister  who  used to try a lot of my recipes when she got married, but few months before we had a new arrival in our family who is keeping her busy all the time. Since then she doesnt do much cooking . She was telling me  that when she checks my blog and find lengthy ingredients she give up straighaway and another reason was  most of the ingredients that  is not easily available there. There might be lot of people like her who want to do simple cooking with readily available ingredients so I am going to really work on that and post some simple recipes and post under the label simple cooking :)
This Aloo tikki defintely falls in that category, it takes only about  30 minutes if you pressure cook your potaoes and with few ingredients  you can serve this is as a starter when you are running out of time :)


Indredients (makes 10 tikkis )
Onion - 1 small(finely chopped 0
Boiled Potato - 5 ( Medium )
Green peas (boiled ) - 3/4 cup
Cumin seeds - 1/2 tsp
Redchilly powder - 1/2 tsp
Chaat masala - 1 tsp ( use a mixture of  garam masala and coriander powder if you dont have chaat masala )
Coriander leaves - finely chopped
Bread crumbs - 3 tbs (optional )
Salt

Oil ( for shallow frying )

Method
  • Mash the potato and keep it aside.
  • Add rest of the ingredients and mix well.
  • Make small balls out of it and flaten  it a little bit in between the palms.
  • In a frying pan add oil and shallow fry the patties on a medium flame for about 4-5 minutes  until they are firm and hold their shapes without falling apart.
  • Serve hot with some tomato ketchup.


Chinese style Noodles with Veg and eggs

$
0
0


I always cook Indian food at home and it takes a whole lot of my time every day. The whole of the last week we got some amazing sunshine with temperature as high as 20 degree  and we spend most of our time outdoors smelling the fresh air and sun basking and at the end of the day when we come inside even the thought of cooking used to tire me, so last few days I have been doing some quick dinners  exploring different cuisines and the dinner used to get ready in 30- 45 minutes ! Inspite of having plenty of sunlight for taking pictures, I didnt  click any and we used to finish our dinner as soon as it got ready and I have to say  the food straight from the pot tastes divine, something which I miss when I blog especially  while photographing some crispy apperizers. By the time whole photo session finishes the food goes cold :( 

Chinese style Noodles was our dinner one day but I couldnt click the picture that day. Since it tasted so good   I had to make it again for two reasons, mainly for eating again and another reason for photographing it. So this weekend with the help of S, I managed to click some step by step clicks as well ! It was a team work as Lil A was also excited about the step by step session and he too was helping S in clicking the pictures and helping me with  stirring and all !

Boil water with salt and little oil .To the boiling water add Noodles

Cook for 3 minutes or until done and drain the water.

Rinse it with some cold water and and mix with few tsp of oil.

In a wok add sesame oil and add 1 tbs od ginger and 1 tbs of garlic.Fry for few minutes.

Add sliced onions, Whites of spring onion and saute for few minutes.
Add veggies chopped lenghthwise.
Add all the sauces( soya sauce, redchilly sauce and worcetershire sauce )
Add salt and pepper
                                                   
Make a well in the centre and break 2 eggs.Scramble the eggs.
                                                         

Add capsicum/ green pepper and green  of spring onions


Finally add cooked noodles.

Ingredients( serves 4 )
Noodles - 400 gm
Ginger - minced - 1 tbs
Garlic minced - 1 tbs
Onion - 2 (sliced lenghtwise )
Spring onions - 5 ( chop white and green separately)
Shredded cabbage - 2 cups
Carrot - 2 large ( chopped lenghtwise )
Soya sauce - 5 tbs
Chilly garlic sauce - 4 tbs
Worcestershire sauce - 2 tbs
Salt
Pepper
Sesame oil
Eggs - 2
Green pepper/ Capsicum- 1 large  ( chopped lenghtwise )

Method
  • In a big saucepan  boil water with salt and 1 tbs of oil. Add noodles to the boiling water and cook for 3 minutes or until done. Drain the water and rinse it with cold water. Add 2-3 tsp of oil to cooked noodles, mix well and keep it aside.
  • In a big wok and 2-3 tbs of oil and add minced ginger and garlic. Fry for 2-3 minutes.
  • Add sliced onions, whites of spring onion and saute on a medium high flame  till soft and brown.
  • Add shredded cabbage, carrot, all the sauces, salt and pepper and cook the veggies until they are 3/4 th cooked.
  • Make a well in the middle of wok and break 2 eggs. Scramble the eggs in the well and mix it with rest of the veggies.
  • Finally add green pepper/ capsicum and green of spring onion and cook for few minutes.
  • Finally add cooked noodles, give it a mix until noodles are coated in the veggies.Check the salt and turn off the flame.


Chocolate eclairs with custard filling

$
0
0

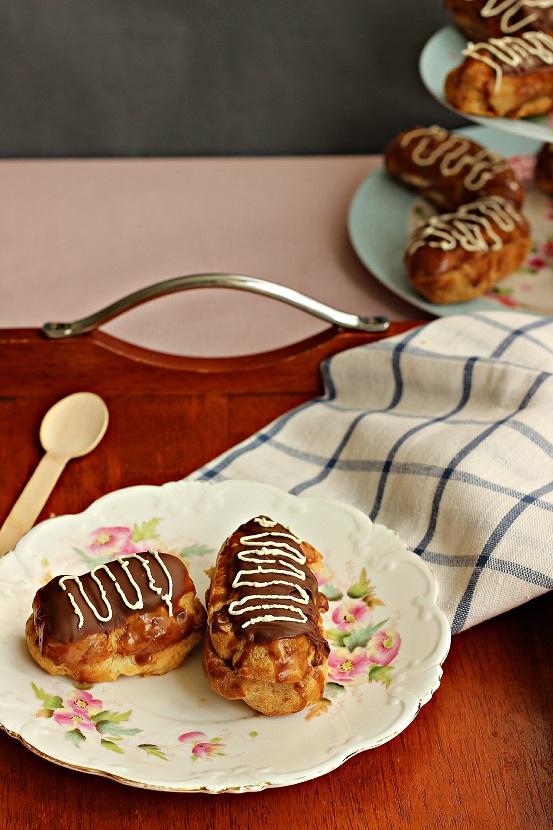
Baking Chocolate eclairs has been in my to do list for a long time.  I have seen bakers baking this on TV and I have been wanting to try my hands on it ever since but like many other things it never happened  and luckily Baking partners came with a lovely challenge of baking chocolate eclairs this month and I was delighted to give this a try. I halved the recipe which yielded me 10 small medium eclairs and I took them to a friends place for a tea party and the they all loved it .

Before going to the recipe let me tell you a little about custard filling too, I have been making homemade custard and custard cream  since a long time eventhough I  never got to blog about it and I have to tell you you should try to make  home made custard atleast once and I am sure you will never go and make custard out of a packet ever again as it tastes soo soo delicious !


INGREDIENTS

For custard filling
Eggs yolks - 3
Milk - 3/4 cup
Double cream - 3/4 cup ( or use  milk )
Vanilla essence - 1 tsp or  Vanilla pod -1 
Sugar - 1/2 cup
Cornflour - 3 tbs
Salt - a tiny pinch

For pastry
All purpose flour/ maida  - 1 cup
Unsalted butter - 4 tbs
Sugar- 1 tsp
Salt - a pinch
Eggs - 2 
Water - 1/2 cup

For chocolate glacing
Chocolate - 100gm
Double cream - 100ml
Butter - 1 tsp
Honey - 1 tsp

METHOD

Making of Custard cream 
  • In a pan take 3/4 th cup of milk  and  3/4 th cup of double cream .Split vanilla bean by running a knife and put the bean in the milk- cream mixture. Place them on a low flame and bring it to boil.Turn of the flame and set aside for 10-15 minutes for the vanilla flavour to infuse.
  • Meanwhile in a bowl whisk  custard powder, sugar, salt and three egg yolks until sugar is dissolved and looks like the picture shown below.
                                   
  • Very slowly add warm milk mixture to this and stir continously taking care not  to cook the  eggs.
  • Pour everything back into a saucepan and cook on a very low flame( must be on low flame )whisking continously until the custrad thickens.Takes about 10- 15 minutes on a very low flame.
  • Transfer the custard into a bowl and cover it with a cling film touching the custard to prevent skin forming.
  • Refrigerate for 2-3 hours.

Making of pastry
  • In a saucepan bring water, butter, salt and sugar to rolling boil. Turn off the flame and add  flour and stir continiously with a wooden spoon for 30-60 seconds until its mixed properly.
  • Return the saucepan to fire and cook for 30 seconds stiring continously and you will get a smooth dough.
  • Transfer it into a standing mixer with paddle attachment or to a mixing bowl with hand beater aside.
  • Break 2 eggs in a bowl and lightly beat them. With mixer running add the beaten eggs to the dough slowly until the dough  is smooth and glossy. Dough should be thick and should fall like a ribbon from the beater. Add more beaten eggs if dough is too tight  to get the smooth dough.
  • Fill a  pastry bag / icing bag with a round tip of 2 cm and pipe a line of about 5-6 cm. Leave few inches between them as they puff up when baked.
  • Finally give an egg wash  with a brush or finger and smoothen  any bumps.
  • Bake them in a preheated oven at 210 degree c for 15 minutes and then reduce the temperature to 190 degree c and bake for another 25- 30 mins.
  • Once baked let them cool .
Making the chocolate Glacing
  • In a saucepan bring double cream to almost boiling point.
  • Turn off the flame and add chocolate, butter and honey. Mix well and set aside.


Assembling


  • Once they are cool make a hole on each eclairs. Fill the prepared custard cream in an icing bag and pipe them into eclairs. You can also cut the eclairs into halves and fille the custard inside.
  • Dip the eclairs into chocolate glacing and set aside until chocolate sets. Decorate the eclairs if you like and  serve them immediately.


Baby shower cake, a Chocolate Mocha cake with Mocha buttercream

$
0
0

With only few weeks for my India trip, blogging and cooking has taken a back seat these days. Lots of things to organise, lots of shopping and moreoever lots of dusting and cleaning to be  done at home too. Usually before going on a vacation  first thing I do is cleaning up  nooks and crannies of home just because I like to come back to a clean house ! Only when I started cleaning I realised that it s a never ending process ! And on top of all this,  summer is not making things easier either. Lil A likes to play out longer and bringing him back home from playgrounds is not that easy :) So after a long day I just curl up in the couch watching Tele with no energy to type a blog post. 

Coming to todays topic, I did this baby shower cake few weeks before. I did try to make a small video for this but unfortunately director didnt do a good job and neither did I ! Many  of my friends and readers have requested me to make tutorials about fondant cakes but as a self tought person  I am still in learning process and each cake is an experiment to me and the uncertainity in the outcome when I start the work is the only problem which stops me from making a tutorial, but inspite of all that I did try to make a video but it wasnt succesfull. So I promise you all that one day when I am confident enough about my work  I will post a video for you all :) 


Flaten out a  ball of fondant.

With the modelling tool shown press the edges for the pattern.


With a flesh coloured fondant roll out an oval face.
Place the face on the pillow and press gently in the place of  eyes.

Make a dummy  and place near the mouth.

This was a chocolate Mocha cake with mocha buttercream. I made two 9 inch cakes  and sadwiched it with Mocha buttercream and covered it with fondant. Placed the  pillow and baby's head on the cake. Roughly  made a small body  and covered it with a fondant blanket. Cut out some polka dots with piping(icing ) tips back side and sticked them with water. Made a small feeding bottle and placed near the sleeping baby. Tada a baby shower cake is ready for u :)

INGREDIENTS ( yields two small  8 inch cakes  for serving 8- 10 )

Plain flour - 1 1/4 cup
Cocoa powder - 1/4 cup
Coffee powder/ granules - 1 tbs
Baking powder - 1 tsp
Baking soda - 1/4 tsp
Salt - 1/8 tsp
Sugar - 1 cup
Eggs - 2 large
Oil - 3/4 cup
Milk - 1/4 cup
Boiling water - 1/4 cup
Vanilla extract - 1 tsp


Method
  • Sift flour, cocoa powder, salt, baking powder, baking soda and keep it aside.
  • In a bowl beat eggs and sugar for few minutes .
  • Add oil, vanilla extract and mix.
  • Mix coffee powder in 1/4 cup of boiling water and keep it aside.
  • Add 1/3 rd   of the dry ingredients and fold in.
  • Add the milk and fold in.
  • Add the next 1/3 rd of dry ingredients and fold in.
  • Add boiling coffee and fold in.
  • Finally add the rest of the  flour and fold in.
  • Pour the batter into two 8 inch  greased cake tins and bake it  in a preheated oven at 180 degree celcius for 20- 30 minutes or until a tooth pick inserted comes out clean.

For Mocha buttercream icing 
Unsalted butter - 200 gm (apporximately 1 cup )
Icing sugar - 400 gm ( nearly 3 cups )
Meringue powder - 2 tsp
Double cream - 100 ml
Salt - pinch
Vanilla extract - 1 tsp
Dark chocolate - 80 gm (melted )
Coffee powder -  1 tsp
Warm water - 2- 3 tbs

Method
  • In a mixing bowl add 1 cup of sugar, salt, meringue powder and mix.
  • Add cream to it and beat it in a electric beater at medium speed with paddle attachment for 5 minutes.
  • Add remaining sugar and beat for 3 minutes.
  • Add softened butter little by little and beat for 5-7 minutes at medium high speed.
  • Dissolve coffee powder in warm water and  keep it aside. Melt chocolate in a heatproof  bowl placed above a simmering pot of water. Let the coffee and chocolate cool.
  • Add vanilla extract, coffee and chocolate to the buttercream and beat at a very low speed for few seconds until mixed.


Cupcakes for a cupcake sale !

$
0
0

No dont read it wrong, I am not yet into cupcake business or anything, by cupcake sale I just meant  I contributed some cupcakes for a cake sale at lil ones nursery for fundraising. I was overwhelmed by the response I got from other mums and teachers for my effort and they decided to jack up the price of my cupcakes which I was a bit sceptical of. But to my surprise the sale went very well and all my pricey cupcakes were sold  in 5-10 mins raising a descent money for Nursery !

Eventhough I wanted to try different flavours and frosting I just went with simple vanilla cupcakes with vanilla buttercream frosting to focus more on decoration. I had plans to make some ballerina cupcakes as well with a balle dress  but bacause of time constraints I couldnt do it. Among all  cupcakes the pirate ones were the one in great demand and it was all gone in less than 1-2 minutes ! So maybe next time I should make more of pirate cupcakes and some ballerina  cupcakes or hello kitty cupcakes  for little girls :)

For cupcakes I used the same recipe of my vanilla cake and the frosting was vanilla buttercream frosting !


Spaghetti Bolognese

$
0
0

We have this Italian restaurant near our place and the ever since I tried spaghetti bolognese from there I was hooked, now  every time I go there  I go through the  menu as if I am going to try something different, but I  always end up ordering the  same thing, silly right ? But thats how much I loved it. Most of the time the portion they give is soo big for me so they pack it in takeway boxes and I enjoy the rest  at home  :) I think it all depends on from where you try it, because atleast for me eventhough I tired it from several restauants, (even from Italy) none of those impressed me like the one served there. I still remember I posted a picture of my favourite sphaghetti in a post long time back which you can find here

Since my  lil one loves spaghetti so much, I make the  bolognese sauce at home and freeze in batches. They are so easy to make and taste really yummy, almost close to the my favourite restaurant's bolognese !


Recipe adapted from here
Ingredients(serves 4 )
Minced beef - 250 gm
Bacon slices - 2
Onion - 1 large
Carrots - 2
Garlic - 3 cloves
Tin of  plum tomatoes(200 gm ) - 1 tin
Water
Fresh Basil - 1 small bunch
Parmesan cheese - 50 gm
Sphaghetti - 250 gm
Oregano - 1 1/2 tsp
Salt
Pepper

Method
  • Place a  big saucepan or wok on flame  and add olive oil. 
  • Add bacon slices and fry for few minutes until its golden.
  • Add chopped onions, chopped carrots and miced garlic and cook for few minutes stirring in between until vegertables are soft. Add salt, oregano and pepper  and cook for a minute or so.
  • Add minced beef and stir till they turn brown.
  • Finally add tinned tomatoes, fill the empty tin with water and add that water too.
  • Bring the sauce to boil and then simmer it for 1 hour with lid on stirring in between.
  • Take the lid off add basil leaves and  cook uncovered for another 15 - 20 minutes, if the sauce is getting dry add little water.
  • Remove from fire and grate half of the paramesan cheese to the hot sauce and stir. Check salt and pepper.
  • Meanwhile cook spagetti according to package instructions, while draining the pasta reserve some cooking liquid.
  • Mix the cooked spagetti and bolonase sauce and add little cooking water if u like to loosen it a little( I didn't do this ). 
  • Serve hot with sprinkles of paramesan cheese on top.

Strawberry Jam and some pictures of Strawberry picking !

$
0
0


Every summer we look forward to one thing in particular which is strawberry picking at our nearby farm. We have been doing it for the past 3 years and its a great fun thing to do with family. Acres of farm with fresh strawberries, rasberries, blackberries, gooseberies, and fresh vegetables like carrot, spinach, cauilflower, broccoli and many more things. Every year when I go there I go crazy seeing all fresh fruit and vegetables and I pick and pick and pick and come back home with a truck load of fruits and veggies. Only when I get back  home I think  " how on earth am I going to store them "  ! We somehow try and eat most of the fruits without storing them in fridge but  storing vegetables in my small fridge has been a challenge and  I end up leaving  few veggies at room tempertaure  for 2-3 days till I find room for them  in the fridge. 

This year has been no different  and I ended up picking a lot, but I have to say it was not as bad as last year. See, I am getting better ! But still I picked nearly 3.5  kilos of strawberry and while picking it, I  must have ate 1/4  kilo from the farm.They say we have to pay for it first before eating  but resisting the red coloured fruits while picking is almost impossible and when I looked around almost everyone who was picking was gobbling the Strawberries ! Coming to the point, making jam has been in my" to do"  list since a long time and strawberry jam is my favourite so this time I knew atleast half a kilo strawberry is going to used in jam making which by the way I did make  the same day. Jam tasted delicious almost like my favourite brand of jam. Making a jam from something you picked and enjoying it a slice of toasted bread is a priceless feeling. If this can  give such a good feeling, I  wonder how it would be if I made jam from starwberries which  I planted :)


Broccoli farm

Add caption


Ingredients
Strawberries - 700 gm
Sugar - 500 gm
Lime juice - from one lemon

Method 
  •  Wash the strawberries and pat it dry.
  • Place the stawberries in a heavy bottomed pan and mash them lightly  with a spoon or fork,leaving few big pieces.
  • Add sugar, limejuice and mix.
  • Place the pan on a medium high heat  till the sugar dissolves, cook the strawberries for 10-15 minutes stirring continously.When its almost the setting point take a cold plate(keep it in freezer for 5 minutes) and add a little of jam to the cold plate and place it back to freezer for 1-2 minutes. Take it out and when you draw a line it should leave a trail.


  • Allow it cool down to room temperature and store the jam in a sterilised bottle.


Black forest cake, a guest post for Priya

$
0
0


Do u all remember a beautiful pinwheel cookie which appeared on my blog sometime back, it  was a guest post by  my dear blogger friend Priya who blogs at Cook Like Priya. When I requested  her to do a guest post here she gave me the very best so when she asked me the same I had to think a lot to come up with something special, so it took a long time and finally I came up with this  Black forest cake.

Priya and I share a special friendship and I was really lucky to meet her in person when she came for Bloggers buzz in London. Ever since we have been catching up every now and then through phone calls and mails and the real bummer was when she has moved back to India. I really wish she still lived here. She is a talented blogger and she has lots of  South Indian specials in her blog as well as some classic bakes. I myself has tried her Raw mango rice and we all loved it. So if are looking for some typical South Indian food, do check out her blog.

Talking about Black forest cake, I have tried black forest cake quite a few times and expect one time, all the  other time cake came out soo well and it was a real treat. So if you are planning to make this I would advice you to be a bit careful with folding because if you over do the folding you might end up with a bread like cake due to the formation of Gluten, especially while making a genoise sponge ( the one I made for this recipe ), it is better to under fold it and if you get it right I assure you that it will be an amazing cake and one of the best black forest cake you can make. I am telling you this because I have tried few other black forest recipes and have even posted 2 different recipes for black forest cake  in my blog which you can find here and here but those two were not as delicious as this one. Head over to her blog for the recipe and for our chit chat session :)


Avacado / Guacamole Sandwich

$
0
0

Summer is almost on full swing here which for me is quite hectic and  I hardly get time for elaborate cooking, so to make my life easier I started waking up early ( thanks for the early sunrise ) and finish of my days cooking in the morning so I can spend more time in playgrounds and park  in the evening without worrying about cooking dinner, but there are some days when I dont cook in the morning and S comes back home home from work with a very hungry tummy, so just to keep his hunger on bay until I finish my cooking I make some healthy quick snacks for him  which gives me ample time to do the rest of my cooking :) Like most of you know Guacamole is a famous Mexican dip made from Avacado which is perfect with some Tortilla chips, but I like to have  Guacamole as a filling for sandwich which tastes delicious and even my lil one loves this to the core and  he likes to eat  this as his dinner  :)


Ingredients( makes 6 traingle sandwiches )

For Guacamole
Avacado - 2 
Red onion - 1 small ( finely chopped )
Tomato - 1/2 ( finely chopped )
Lemon juice - 1 tbs
Salt
Pepper
Coriander leaves - (finely chopped )

For sandwich
Bread - 6 slices
Butter ( optional)

Method
  • Cut the Avacado into two, remove the stone and scoop out the flesh to a bowl.
  • Mash the avacado with a spoon and add chopped onions, chopped tomatoes, lemon juice, salt, pepper, coriander leaves and mix. Your Guacamole dip is ready.
  • Spread butter(if using ) on your bread ( I like to toast my bread ) and spread the guacamole evenly on one side of the bread. Place the second slice on top and cut it into half ( triangles)  with a sharp knife.
  • Serve immediately.


Some Vacation Pictures and Giveaway winner !

$
0
0


A big hello to all...I am back after a months break. As many of u know I was on Vacation in India and getting back to routine after a break is not that easy especially as I am having an extended  holiday in London  as my parents also came along with us for a visit. I am busy taking them around  for sight seeing and cooking for them. 

Whenever I post my recipe pictures in Fcebook or my blog, my Dad always used to ask when am I going to cook for them as I never kind of cooked my specialities in India. I need  my kitchen and my ingredients to cook on my own comfort so when I am elsewhere I usually assist but doesnt do much cooking :) So I am keeping my promise these days by cooking for them which gives me immense pleasure. 

I will be back with a recipe soon but till then here are some vacation pictures for u all :) This time the Monsoon in kerala was the heaviest in 13 yrears and it was raining thorughout during our holidays neverthless we enjoyed each and every moment of our trip.

Also just wanted to let u know that I  picked  the giveway winner before I left to India and its none other than Rafeeda of Big sweet tooth , congrats Rafee :)


Cupcakes to say thank you

$
0
0

Time surely flies quickly. It seems only yesterday lil A started nursery and before I knew he finished his nursery and is all set to start School next month in a new School in a brand new environment. I am so thrilled about the whole  thought of him going to  school wearing a  uniform and packed lunch. When he finished his nursery last month I wanted to thank his nursery teachers in my own way and I couldn't think of anything else other than some personalised  cupcakes. Lil  A was also happy to make cupcakes for teachers and since  It was 2 days before my vacation  I was under lot of stress while making this but somehow I managed to pull it out at the  last minute. The teachers were so happy and touched by the gift which made all my effort worthwhile. It was an emotional day for me too, I  was  sad to see him say good bye to his teachers and friends but after all it was for a new beginning :) Anyway the cupcakes I made  was chocolate cupcakes with chocolate buttercream which  always wins hearts and this was no different  :)


Idiyappam/ Nool puttu

$
0
0


Eating cooked breakfast even 3 days a week  was a luxury for us here, but these days since  my parents are here we  get to eat cooked breakfast 7 days a week, and we r totally enjoying all that luxury. Like everytime this time also my mum prepared everything possible for us to bring here which included all homemade spice powders, rice flour, Puttu flour etc etc.. And to make a good idiyappam/ nool puttu you  need a good quality rice flour and what can be better than the rice flour my mum milled for me from rice mill with home grown rice. Oh yes it is  a 5 star rice flour as it involves all the  effort my mum takes in growing our own rice in  paddy fields ,so do I need to say about the outcome ?? It was melt in mouth and super soft idiyappams, the best idiyappams ever.

Every year after our vacation we will be eating such nice stuffs for a while and when it finishes we switch to the readymade flours and I should say that transition is a nightmare, I can't even compare how the taste vary, but soon our taste buds adjust to the readymade flour and we start to enjoy that as well but still I got to say the nothing can beat that homemade taste :) So if you want to make a your own rice flour and have a good rice mill nearby go ahead and soak some rice, drain it and send it to the mill to make the finest powder and roast it well and a first quality flour is ready for u. I dont reccomend using mixie for making  rice flour at home as they dont do a good job and the taste wont be good as the one milled in rice mill, but if you dont have other option go ahead and make  it in mixie or buy readymade flour and make some idiyappam and enjoy !


Ingredients (serves 3)

Rice flour - 11/2 cups
Boiling water -2 1/4 cup or as required 
Oil - 1 tbs
Salt

Method
  • Roast the rice flour for few minutes.
  • Boil the water and add salt and oil.
  • Add roasted rice flour to the boiling water and mix well with a wooden spoon.


  • Mix until you get a smooth dough like the picture below.


  • Fill the idiyappam maker with smooth dough and rotate the handle and fill the idiyappam on to each holes of idly maker filled with a  little grated coconut.


  • Steam the idiyppams for 7-8 minutes.
  • Enjoy with some egg curry (recipe will follow soon )

Kerala Egg curry/ Mutta curry

$
0
0

There is a part inside me  wishing for a joint family life, living in a big  house full of people having lots of fun. Might  sound crazy right ? But thats what I feel now especially since my parents are here with me now. Work is divided between everyone which  makes life easier. It has been weeks since I have folded my clothes or hung the washings or  given lil A a shower. Mum does everything for me. Luckily the job I hates the most is not so boring for Mum and vice versa !!

Making lil A speak his mother tongue was one of the biggest challenge for us. Both me and S being less patient  gave up the effort after trying for while but surprisingly few weeks with grandparents did the all trick. I feel so happy and thrilled to see him speak his mother tongue. I really wish he wont switch back to English once they leave to India in few days time. The mere thought of my parents leaving is giving me an insecure feeling, but after all thats life !

Coming back to todays post, its egg curry/ mutta curry my favourite curry to go along with idiyappam. I usually enjoy eggs in all forms, be it boiled, scrambled , poached, omlette , fried or even half boiled. Yes I am  a total  egg fan. If not for the fat in yolks I could have enjoyed eggs everyday :) So do I need to say how much I love this egg curry !


Ingredients

Onion - 3 medium( thinly sliced lenghtwise )
Tomato - 2 small
Ginger (minced )- 1 tbs
Garlic (minced ) - 1 tbs
Green chillies -2 (slit lenghtwise )
Fennel seeds (perum jeerakam ) - 1 tsp
Redchilly powder - 1 tsp
Turmeric powder - 1 tsp
Coriander powder - 2 tsp
Chicken masala - 1 tsp
Salt
Sugar - 1/2 tsp( optional)
Boiled eggs - 3 ( cut into half )
oil
Water - 1/4 cup
Coconut milk - 3/4  cup
Curry leaves - few sprigs


Method

  • In a saucepan add oil .When the oil is hot add fennel seeds and fry for a minute.
  • Add sliced onions and a pinch of salt and saute until onions are light brown in colour and soft (takes about 15- 30 minutes )
  • Add minced  ginger, garlic, green chillies, few curry leaves and fry for a minute.
  • Add redchilly powder, turmeric powder, coriander powder, chicken masala and stir for a minute. 
  • Add chopped tomatoes and stir until tomatoes are cooked and mashed.
  • Add water , check salt and let it cook covered for 5 minutes.
  • Finally add coconut milk, rest of the curry leaves and  boiled egg. When it is about to boil turn off the flame.

Enjoy the egg curry with Idiyappam / chapathy /  wheat dosa /  appam or even bread :)

Chilly paneer with step by step pictures

$
0
0

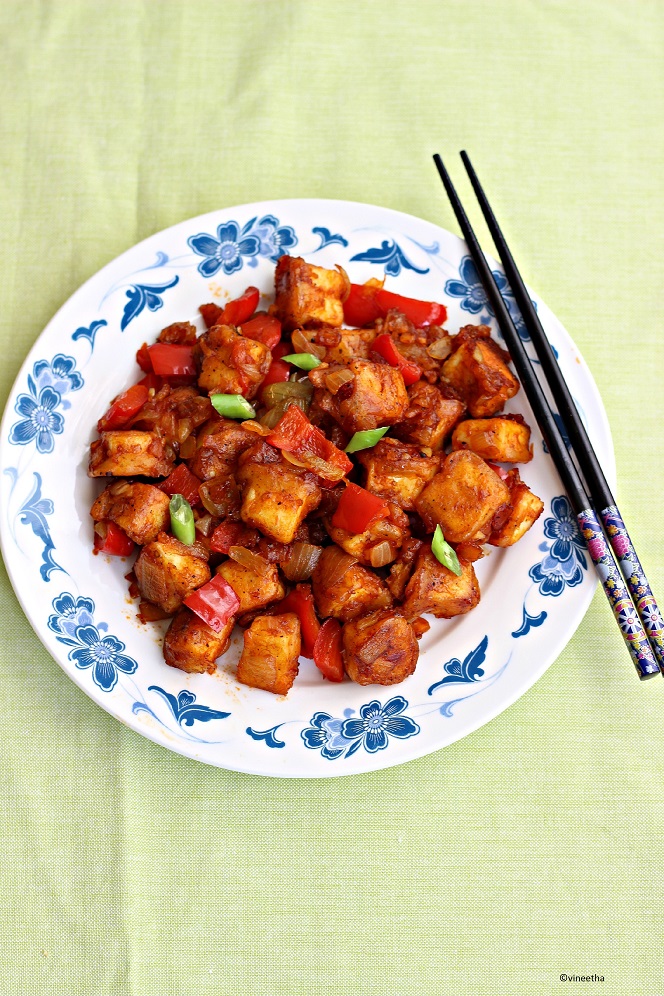
When I am in a restaurant, there are some particular dishes which I read over and over again  but  never bothered  to order or wonder how it tastes. Chilly paneer is one such thing, my few friends here have been telling me that  there are  some Indian restaurants around where they  serve very good chilly paneer. But nope.. I still didnt want to taste it ! Wondering what changed now ?? Since my parents are here on holiday I have been cooking a lot for them and the  other day when  I was cooking  my Paneer butter masala  my mum asked me whether I know how to make chilly paneer. I used to think that chilly paneer is popular only in my age group and is a relatively new thing, but she told me that years ago  when I was a school girl our family went for a holiday  somewhere and we ordered chilly paneer from a restaurant along with roti  and the taste of  that chilly  paneer is something she cant forget and still in her tongue ! Well after that  I had to rethink about my outlook towards the whole chilly paneer and thats how decided to go ahead make this especially for my mum :) And the verdict ....yes I loved it too. Now when  I want to make a dry paneer dish I dont have to always rely on Kadai paneer, infact I liked it better than kadai paneer :) So if you are paneer fan and like Indo chinese food, this is the kind of dish for u.


Ingredients

For marinade and frying 
Paneer - 250 gm
Maida/ plain flour - 4 tbs
Cornflour - 2 tbs
Ginger garlic paste - 1 1/2 tsp
Salt
Pepper - 1/2 tsp
Water - 1/4-1/2 cup
Oil for shallow frying 

For sauce
Onion - 2 medium ( cubed )
Capsicum/ pepper - 1
Green chillies - 2( cut diagnoly )
Minced ginger - 1 tsp
Minced garlic - 1tsp
Tomato sauce/ tomato ketchup - 3 tbs
Soya sauce - 2 tbs
Chilly garlic sauce - 2  tbs
Salt 
Cornflour - 1 tbs
Water - 3 tbs

Method
  • In a bowl add Plainflour, cornflour, salt,pepper, ginger garlic paste and water and make a batter ( thick enough to coat the paneer )                                                                                                 


  • Dip the paneer in the batter and shallow fry them in a pan adding oil flipping the sides until they are golden brown. Drain it on paper towel / kitchen tissue and keep it aside.                                     
  •    In the same pan add minced ginger, minced garlic and fry for 1-2 minutes.                          
   

  • Add cubed onions  and chopped green chillies and saute until onions are soft.                                   


  • Add tomato sauce.                                                                                                              


  • Add soya sauce .                                                                                                                          
     
  • Add chilly garlic sauce and cook for few minutes until oil starts to separate.                                                                                                              


  • Add chopped capsium and stir for 1-2 minutes.                                                                    
                                                                               
  • Now add the fried paneer cubes and coat it in the sauces and cook it covered for 3- 5 minutes.                                                                                                                                 

  • Finally dissolve 1 tbs of corn flour in 3 tbs of water and pour this to the paneer and mix well. Cook for another 1-2 minute and turn of the flame.                                                                

    Enjoy !!


Happy Onam

$
0
0

Wishing all my friends a very Happy onam. Those who doesnt have any idea about Onam, let me enlighten you :) Onam is the harvest festival of Kerala,India. Onam always falls during the month  Aug - sep of every year. Malayalees all around the world celebrate this festival irrespective of religion. Few highlights of this festival are Ona Pookalam (flower carpet ) which we do with fresh flowers, family get togethers and finally an Onasadhya ( vegerterian feast ) :)
Eventhough I make sadhya every year I havent been able to post all my sadhya recipes as I never get time after the whole cooking. So below are links of  few of them which I managed to blog so far :)

    Sambar 

     Avial


                                                  Semiya Payasam                                               
                                                         

      Have a fabulous Onam !!

Kozhi Pidi/ Irachi pidi/ Rice dumplings in Chicken gravy

$
0
0


I used to dream that when my lil one starts school full day I will get  into some serious blogging and do a lot of cooking. Its almost  2 weeks since he started school and  still I havent done much of blogging or even cooking. When my parents were here my kitchen was soo busy and lots of cooking did happen but now expect in the morning my kitchen is all so quiet and my house is soo silent except the noise of  some cars speeding by ! So I guess getting into that mood might take some time as I am in the  holiday withdrawal  mode reminiscing all the good times we had the past 2 months. Now that I have a few hours all by myself I am also looking for options to make myself useful other than just sitting at home which  has also taken its toll on  my hobbies, but anyway I am sure about one thing whether I am  free or busy I will never abandon this little blog of mine :)

Anyway coming back to topic...Have you ever craved for something which you have never cooked or tried ?? Well one fine morning I got a craving for eating this from nowhere, I wonder how it came but that day  I ignored it beacuse if my laziness, but few days passed by and it was still in the corner of my mind and after a week or soo the craving  hit back with all its strength which  left with no choice rather than making it. So after googling it I came across few  recipes herehere and here and  I adapted the recipe from all three to make  my own :) I am glad I did as we all loved it and now even if I crave for it I can rely on my blog to whip it up in a jiffy :)


Ingredients

For pidi/ dumplings

Rice flour - 1/2 cup
Water - 1 - 1 1/2 cup
Shallots - 3-4 
Fennel seeds - 1 tsp
Grated coccnut - 1/2 cup
salt 

For chicken masala
Boneless chicken - 250 gm
Onion - 2( finely chopped)
Tomato - 1 small( finely chopped )
Fennel seeds - 1 tsp
Ginger -garlic paste - 1 1/2 tsp
Red chilly powder - 3/4 tsp
Turmeric powder - 1/8 tsp
Pepper powder - 1/2 tsp
Coriander powder - 1 tsp
Garam masala or  chicken masala  -  1 tsp
Salt
Curry leaves
coriander leaves
Green chillies - 1 or 2
oil

For coconut gravy 
Coconut oil - 1 tbsp
Grated coconut - 1/4 cup
Whole garam masala ( small piece of cinnamon, one clove, one cardamom, one bay leaf )
Thin coconut milk - 1/2 cup
Thick coconut milk - 1/4 cup
salt

Method

Making of Pidi
  • In a bowl take the rice flour, add salt, boiling water and make a dough. 
  • In a Mixie make a course paste of grated coconut, shallots and  fennel seeds.
  • Add the paste to dough and mix well, knead and  make a smooth dough.
  • Take a small ball of the dough( 1 tsp ) and roll it into a ball and gently press it down and make an impression in the middle with the thumb.                                                                           

  • Steam it for 10 minutes.


Making of chicken masala, coconut gravy and the final process.
  • Cut the Boneless chicken into small cubes.
  • Marinate the chicken cubes with chilly powder, turmeric powder, coriander powder, chicken masala, pepper powder, ginger garlic paste and salt.
  • In a saucepan or cheena chatti /kadai add coconut oil and add fennel seeds and when it releases smell add  finely chopped onions, curry leaves  and saute until onions are brown and soft.
  • Add  chopped tomatoes and cook until mashed and becomes a paste.
  • Add marinated chicken, salt and cook until chicken is done
  • Meanwhile in a nonstick pan add coconut oil and add the whole garam masala and saute for a minute or so.
  • Add grated coconut and roast it until golden brown. Once its cool grind it into a paste.
  • Add the grinded paste and the thin coconut milk to the cooked chicken.
  • Add the steamed pidis/ dumplings to it and cook it covered for 3-4  minutes.The masala will be coated well into the dumpling now.
  • Finally add the thick coconut milk and when its about to boil turn off the flame.
  • Garnish with coriander leaves if you like.


SERVE WARM AND ENJOY !!

Bloggers Buzz Photography session 2

$
0
0
Life has been crazy busy last couple of days, it got so busy all of sudden so I hardly got time to check out  my blog baby..but here I am again with my short story of Bloggers Buzz phtography session 2.Two weeks back, a bunch of us bloggers met at our fellow blogger Suchi's place for BBPC session 2, those who are wondering what that is about, here is a brief description .. Bloggers Buzz is a conducting a photography workshop on a monthly basis led by Nisha thomas of My kitchenantics and we are learning a lot from her and also from each other. Food photography  has never been so interesting to me before. This month we covered how to shoot food pictures with diffused back lighting and we choose cupcake theme for our pictures. We were asked to take few cupcakes with us and shoot it with diffused back lighting. Under Nisha's guidance we shot pictures in different angles with different styles. Overall it was a productive day and in the end we got to eat cupcakes what our friends baked and the  lovely Paav bhaji Suchi cooked for us. I had  a stuffed tummy that day and probably I was on sugar high from all the cupcakes I ate ! 

This month we also learnt about post processing and it was done by Suchi of  Kitchen karma.She made a great tutorial on how to edit pictures in Pic monkey on Bloggers buzz website and she has done a fabulous job making the tutorial and making it so easy to follow and understand for anyone. So do check out the tutorial and about the diffused lighting  here

Also find below few of the pictures I clicked during the session :)

Cupcake by me, Vanilla cupcakes with vanilla buttercream 


I used the same recipe of my vanilla cake for cupcakes which you can find here and also find the recipe of vanilla buttercream here.
Cupcakes which Manjiri of Slice off me brought for the session.

Cupcakes by Gayathri of Mummy and Me

Cupcake by Nisha of My Kitchenantics

Thai Red Chicken curry

$
0
0
Couple of days back I ran into an old friend of mine at a bus stop, after few minutes of catching up, our topic moved onto Food. She was from Thailand , so the  first thing I asked her was about  good Thai eating places around. She replied that  her close friend was a chef in  one of the  popular restaurant around and eventhough its popular she said its not the authentic kind of Thai and she wouldnt reccomend it !! I guess thats the story of all resturants outside the homeland :)
So my next question was about the famous thai red curry paste as I absoultely love  Thai curries, especially Thai red curry. When I asked that  I was expecting a recipe of Thai curry paste from her but her  answer was quite surprising, she said she buy it from the  Thai section of Asian grocery shop where  I go. So thats was it, I knew I will be picking the paste and making the curry soon. So during this weeks trip I picked Thai curry paste, Palm sugar and fish sauce from the shop. I was apprehensive about how it would taste but I am super glad I cooked it as it was one of the tastiest and quickest chicken curry I have ever made. No sauting onions, no roasting  or grinding , just fry the paste, add conout milk, chicken and some veggies and simmer, a delcious curry will be ready in well under 30 minutes ! 


Ingredients
Boneless chicken - 500gm
Thai red curry paste - 100 gm
Oil
Carrot - 1
Green pepper/ Capsicum - 1/2 ( I didnt use it )
Baby corn - 5-10
Beans -5-10
Palm sugar - 4 tsp
Fish sauce - 1 tsp
Coconut milk - 400 ml
Water - 1 cup
Sweet basil leaves - few (optional, I didnt use it )
Thai red chillies ( to garnish )

Method
  • In a saucepan add oil and fry the thai red curry paste for 1-2 minutes.
  • Add chicken ( cut into cubes) and veggies ( cut lenghthwise ) and saute until its well coated in the curry paste for 1-2 minutes.
  • Add coconut milk, water and bring to boil.
  • Add palm sugar, fish sauce and cook it covered until chicken and veggies are cooked.
  • Finally add some sweet basil leaves and turn off the flame.
  • Garnish with chopped redchillies and serve warm with steamed rice 

BEN 10 Cake and How I made it :)

$
0
0


Last weekend was a special one for us, it was our lil ones 5 th birthday party. I have been busy planning the party and organising it and finally I can relax now...its all over and it was a great party indeed. Throwing a birthday party is not that easy but with little pre planning anyone can throw a great party without any stress. This time we also got to fix all the mistakes we made last year which helped us in successfully executing this one. I am so happy that all the kids who came for the party had a great Magical experience with the Magician and great fun with the instant balloons she twisted upon their request :) 
It was basically a kiddie party with full focus on kids. All the party food for kids were almost the standard party menu which we see in kids parties here and it  involves no cooking :) So everything was bought readymade and it made my job easier. Here is the list of food I served for kids

Chicken sandwiches
Cheese sandwiches
Jam sandwiches
Mini Pizza's
Cocktail sausages
Grapes
Carrot sticks
Cucumber sticks
Crisps
Cake
Juice

There was an adult platter for parents too ...

Pepperoni pizza
Mozerella and Spinch Pizza
Wontons
Spring rolls
Prwan toast
Mango Juice


And about the cake, it was red velvet cake with Cream cheese frosting  and I am so glad I finally got a bit of red colour this colour this time, I always had trouble getting the colour, as none of the colours worked. I also wanted a Natural colour since adding artificial one is a strict no to me. This time also when the came came out of the oven  I didnt see the red colour outside so I was a bit  disappointed and I even told my friends about the disaster, but the next day when  I cut the cake for levelling and decoration, voila there was this red colour inside !! 

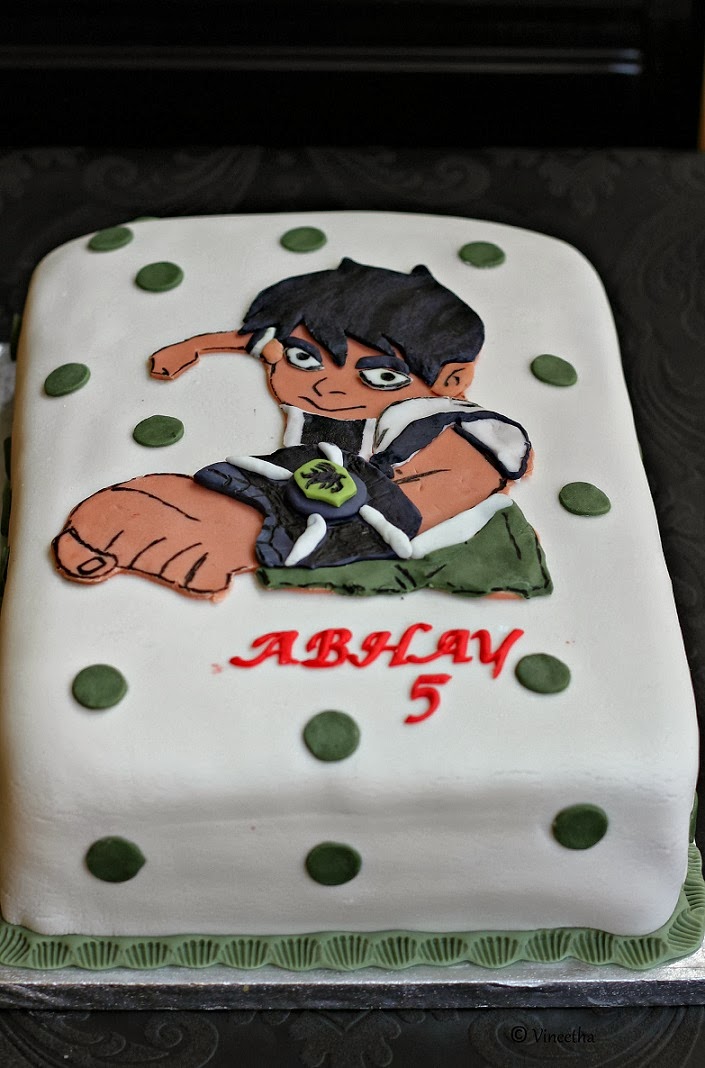
After lots of thinking and confusion finally my boy said  he wanted a Ben 10 cake for his party. Eventhough I tried to convince him that making a Ben 10 quite a lot of work,  he insisted that he wanted Ben 10, So I had no choice other than making one. This time I decided to do a  fondant cut out for Ben 10 rather than making a figurine,  I could have easily bought Ben 10's edible picture from shops but I wanted to take this as a challenge and I thought incase if I screw this up I can always order one edible picture from our cake shop nearby :) But I was quite happy with the way it came out and he loved it. 

Here are few pictures of my step by step progress, I only managed to click few as  it was a toughh really tough work for me ! It tested all my patience, and if you look closer you can definitely see my lack of patience here and there :)

Using the print out of the picture I rolled fondant and cut out the outine.

I cut out the hair and the trousers and watch from print out and used that to cut out fondant  hair, trousers, sleeve  and watch from  black, green and white fondant.

I drew the outine, nose, ear, pupil  and fingers with an edible black pen. Eye brows and eyes were made swith mall fondant cut outs.The ghostly figure on the watch was drawn with a black edible pen. Finally sticked some polka dots and gave a border and wrote is name :)

Also before I sign off  here are few pictures from our party !


Viewing all 234 articles
Browse latest View live